Microsoft has released Windows Copilot for the stable version of Windows 11. It is available on the Windows 11 Taskbar. If you do not see Windows Copilot on the Taskbar, update Windows 11 to the latest OS build. You can view your current Windows 11 build by using the winver.exe tool. If you do not want to use Windows Copilot, you can disable it. In this article, we will show you how to disable Windows Copilot in Windows 11.

How to disable Windows Copilot in Windows 11
In Windows 11, you can uninstall, deactivate, turn off, or permanently disable Windows Copilot by using Settings, Group Policy, or Registry Editor. Let’s examine each method in detail.
1] Disable Windows Copilot in Windows 11 via the Settings app
This is the easiest method to disable Windows Copilot in Windows 11. The following instructions will guide you on this.

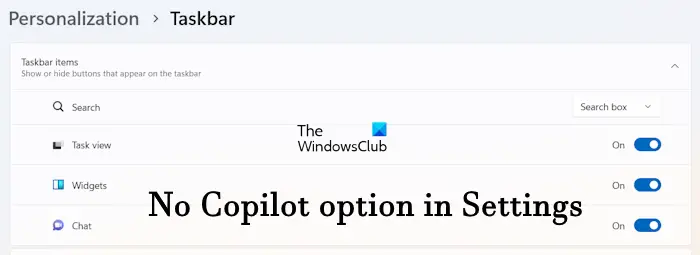
- Open Windows 11 Settings.
- Go to Personalization > Taskbar.
- Expand the Taskbar items section.
- Turn off the Copilot (preview) button.
When you turn off the Copilot (preview) button, the Copilot icon will disappear automatically from the Taskbar.
Disabling Windows 11 Copilot from Windows 11 Settings is the easiest method. But it has a disadvantage for you if you have a shared computer. This is because another user can enable it through Windows 11 Settings. Hence, if you want to disable Windows Copilot permanently, you can use the Local Group Policy Editor or the Registry Editor.
Related: Windows 11 Copilot Download, Install, Features, Settings, Remove
2] Disable Windows Copilot in Windows 11 by using the Local Group Policy Editor

This method will completely disable Windows Copilot in Windows 11. The Local Group Policy Editor is not available in Windows 11 Home editions. Therefore, Windows 11 Home users can skip this method.

The steps to disable Copilot in Windows 11 by using the Local Group Policy Editor are explained below:
- Open the Run command box by pressing the Win + R keys.
- Type gpedit.msc and click OK.
- When the Local Group Policy Editor appears on your screen, navigate to the following path.
User Configuration > Administrative Templates > Windows Components
Expand the Windows Components folder and look for Windows Copilot. Once you find it, select it. Now, double-click on the “Turn off Windows Copilot” setting on the right side. By default, it is set to Not Configured. You need to select the Enabled option. When you are done, click Apply and then click OK.
As you apply changes, you will see that the Windows Copilot icon disappears immediately from the Taskbar. If Copilot does not disappear from the Taskbar, restart your computer. Open Windows 11 Settings and go to “Personalization > Taskbar.” You will see that the Copilot (preview) option has also gone from there.
If you want to bring Windows Copilot again, change the Turn off Windows Copilot setting in the Group Policy Editor to either Disabled or Not configured. After that, click Apply and then click OK to save the changes.
3] Disable Windows Copilot by using the Registry Editor
This method will work on all editions of Windows 11. Therefore, if you are a Windows 11 Home user, you can also use this method to disable Copilot permanently. You have to make modifications in the Windows Registry. Therefore, follow all the instructions provided below carefully. Any incorrect entry in the Registry Editor can make your system unstable.
Before you proceed, we recommend you create a System Restore Point and backup your registry.

Open the Registry Editor. Copy the following path and paste it into the address bar of the Registry Editor. After that, hit Enter.
HKEY_CURRENT_USER\Software\Policies\Microsoft\Windows

Make sure that you have selected the Windows key on the left side. Now, expand the Windows key and select the WindowsCopilot subkey under it. If the WindowsCopilot subkey is not present under the Windows key, you have to create it manually.
To manually create the WindowsCopilot key, right-click on the Windows key and select New > Key. Name this newly created key as WindowsCopilot. Now, select the WindowsCopilot key and right-click in the empty space on the right side. Select “New > DWORD (32-bit) Value.” Name this newly created value as TurnOffWindowsCopilot.
Right-click on the TurnOffWindowsCopilot value and select Modify. Enter 1 in its Value data. Click OK to save the changes.
Unlike the Group Policy Editor, changes will not take effect immediately after modifying the Registry Value. You have to restart Windows Explorer. If this does not work, restart your computer.
After restarting your computer, you will see that Windows Copilot has gone from the Taskbar and there is no option to enable it in Windows 11 Settings.
If you want to revert changes, change the Value data of the TurnOffWindowsCopilot value to 0 in the Registry and restart your computer. If this does not work, delete the TurnOffWindowsCopilot value and restart your computer.
That’s it. I hope this helps.
How do I turn off Windows 11 features?
Windows 11 has some optional features that you can enable or disable as per your requirements. If you want to turn off some Windows 11 optional features, you need to open the Windows Features via the Control Panel. Alternatively, type Turn Windows features on or off in Windows 11 Search and select the best-matched result.
How do I change my Windows 11 back to 10?
If you have upgraded from Windows 10 to Windows 11, you will have an option to roll back to Windows 10 again. But you have to make your decision within 10 days after upgrading to Windows 11. After 10 days, the rollback to Windows 10 option will disappear. If you have made a clean installation of Windows 11, you cannot go back to Windows 10. In this case, if you want to use Windows 10, you need to perform a clean installation of Windows 10.
Read next: How to use Microsoft Copilot in Word.
